Guide customers through identity verification, track progress, and handle each outcome.
After creating a customer, two processes run in parallel:
- Credit analysis — Dinie automatically starts evaluating the company's credit profile.
- KYC verification — the customer needs to submit documents and complete biometrics at their own pace.
You don't need to wait for the credit analysis to start the verification. As soon as the customer reaches pending_kyc status, present the option to start biometrics.
When the customer.created webhook arrives (or when the status changes to pending_kyc), present the customer with the option to start verification. You can show an explicit button or start automatically.
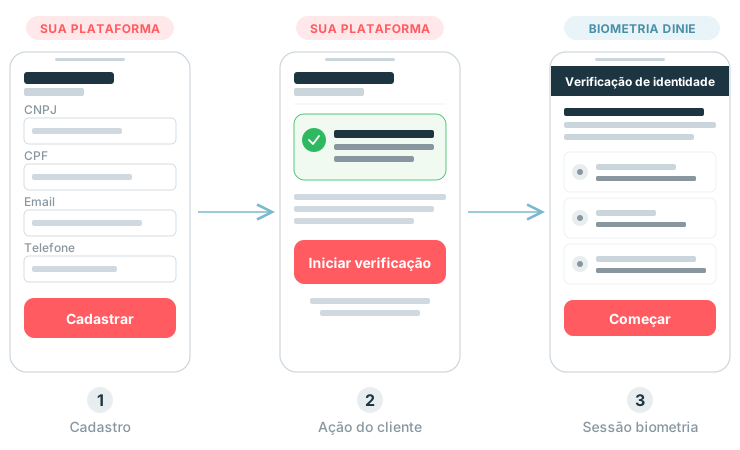
The key is to communicate that the customer needs to complete identity verification to receive credit offers.
When the customer confirms they want to start, create a biometrics session:
const session = await client.customers.createBiometricsSession(customer.id);

// Open this URL in a webview or redirect the customer
console.log(session.session_url);
console.log(session.expires_at); // Expires in 30 minutes
Open the session_url in a webview (mobile) or redirect the browser (web). The session expires in 30 minutes — if it expires, generate a new one.
Tip: If you already have some of the customer's documents, you can upload them via API before generating the session. Pre-uploaded documents will already appear as complete in the session, speeding up the process for the customer. See Advance API Uploads.
In the biometrics session, the customer will see the list of required documents. Documents already uploaded via API appear as complete. The customer needs to complete the pending items.
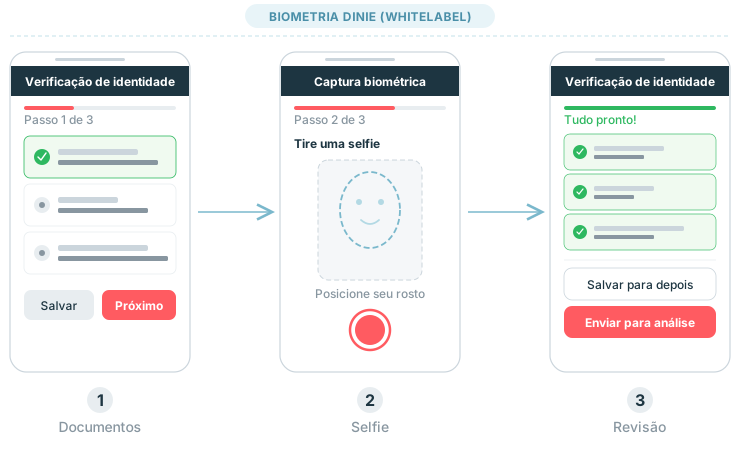
The session flow includes:
- Document upload — photos of ID (CNH or RG), proof of address, company documents
- Selfie — captured by the customer via the device camera
- Review — view everything submitted before confirming
At the end, the customer will have two options:
- Save for later — progress is kept, but analysis is not triggered
- Submit for analysis — triggers verification of all documents
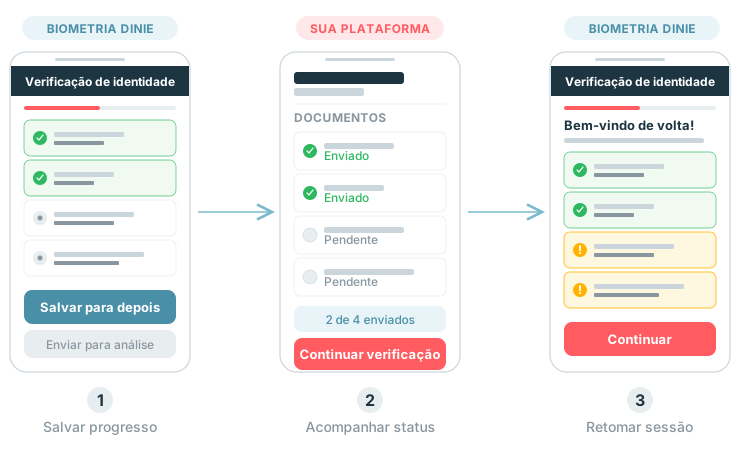
If the customer chooses "Save for later", they will return to your environment. No analysis is triggered at this point — the customer can come back at any time to continue.
You can track progress in two ways:
Via webhook: receive customer.kyc_updated whenever a document is uploaded. The payload includes the updated kyc array.
Via API: query the customer and check the kyc field:
const customer = await client.customers.get(customerId);

for (const req of customer.kyc) {
  const status = req.submitted ? "Submitted" : "Pending";
  console.log(`${req.label}: ${status}`);
}
Show the customer their verification progress — which documents have been submitted and which are still pending. To let the customer resume, just generate a new biometrics session. Previous progress is preserved.
When the customer clicks "Submit for analysis" in the biometrics session, Dinie starts verifying all documents. You will receive the customer.under_review webhook, and the customer's status will change to under_review.
app.post("/webhooks/dinie", express.raw({ type: "application/json" }), (req, res) => {
  const event = client.webhooks.unwrap(req.body.toString(), req.headers);

  if (event.type === "customer.under_review") {
    updateCustomerScreen(event.data.external_id, "Under review");
  }

  res.sendStatus(200);
});
From here, Dinie can approve, deny, or flag specific documents for correction.
If all documents are approved, the customer receives active status and you receive the customer.active webhook.
This does not mean credit offers are ready. Credit analysis runs in parallel and may take longer. Once the customer is active, Dinie continues processing the credit analysis.
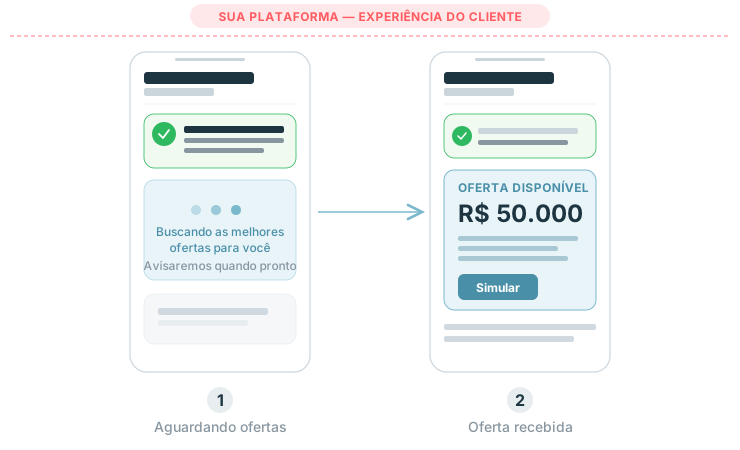
When an offer is available, you will receive the credit_offer.available webhook:
app.post("/webhooks/dinie", express.raw({ type: "application/json" }), (req, res) => {
  const event = client.webhooks.unwrap(req.body.toString(), req.headers);

  if (event.type === "customer.active") {
    updateCustomerScreen(event.data.external_id, "Verified");
  }

  if (event.type === "credit_offer.available") {
    const offers = await client.creditOffers.list(event.data.customer_id);
    notifyCustomer(event.data.external_id, offers);
  }

  res.sendStatus(200);
});
Info: Between
customer.activeandcredit_offer.available, show the customer a message like "Verification complete, we're finding the best offers for you". This conveys that the process is still moving forward.
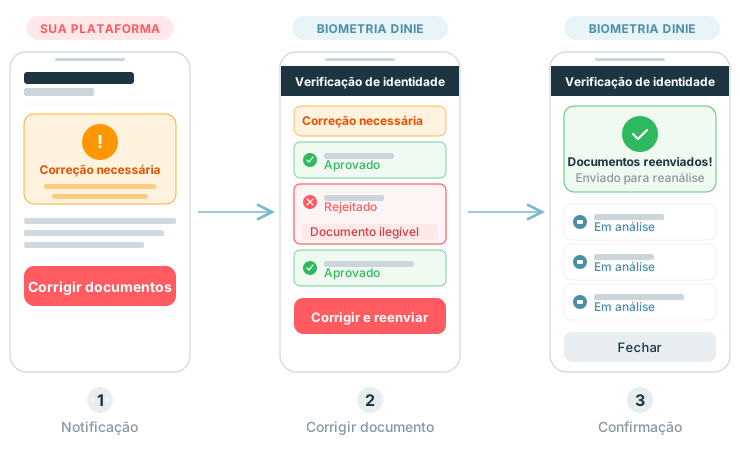
If Dinie finds issues with any document, you will receive the customer.kyc_updated webhook with details. Check the kyc field to see which documents were rejected:
const customer = await client.customers.get(customerId);

for (const req of customer.kyc) {
  if (req.submitted?.review_status === "rejected") {
    console.log(`${req.label}: Rejected — ${req.submitted.review_reason}`);
  }
}
Show the customer which documents need correction and the rejection reason. You don't need to do anything directly via the API — just present a button for the customer to open the biometrics session again:
// Generate a new session for the customer to fix documents
const session = await client.customers.createBiometricsSession(customer.id);
redirectCustomer(session.session_url);
In the session, rejected documents will appear highlighted with the rejection reason. The customer fixes them, resubmits, and the cycle repeats until all are approved.
If the customer is permanently denied, you will receive the customer.denied webhook. This means Dinie could not approve the customer in the KYC analysis (e.g., fraud detected or company closed).
In this case, inform the customer that credit is not available at this time. Unlike the approved-without-offers scenario (where the customer may receive offers in the future), the denied status is final.
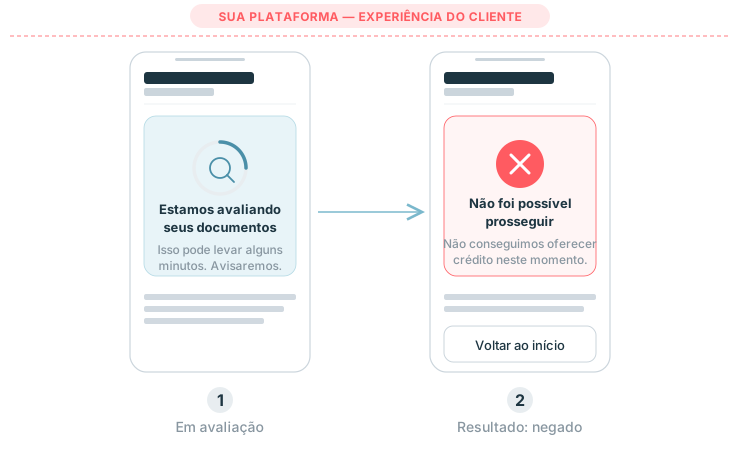
Warning: Do not communicate the specific denial reason to the customer. Only inform them that it was not possible to proceed with the analysis at this time.
| Step | Partner action | API / Webhook |
|---|---|---|
| Customer created | Show verification button | customer.created webhook |
| Customer starts | Create biometrics session | POST biometrics |
| Customer in session | Wait | — |
| Save for later | Show progress | customer.kyc_updated webhook or GET customer |
| Submit for analysis | Show "under review" | customer.under_review webhook |
| Approved | Wait for offers | customer.active + credit_offer.available webhooks |
| Document rejected | Show reason + button to fix | customer.kyc_updated webhook |
| Denied | Inform customer | customer.denied webhook |
- Registration & Offers for the full customer creation flow
- KYC Requirements for details on document types
- Simulation & Origination for the next step after receiving offers
- Webhooks to configure notification endpoints